Load Microsoft Word. To do this, while in Windows 95, locate the following icon from
the start-programs menu: ![]() . Next, click on
this icon and Microsoft Word will begin.
. Next, click on
this icon and Microsoft Word will begin.
You will get a blank white screen with a blinking cursor as well as a menu on the top of your screen. The white area on the screen is where you type in your text. Go ahead now and type in some words. You'll see them appear. That is your text. To edit your text, do the following:
Press enter now. You will go to a new line.
Type in "the fox jumped over the lazi dog" -notice that the word lazi is misspelled and should be lazy. Underneath the word will appear a red squiggle- this indicates to you that this word is misspelled. Also notice, that the "t" in the word the was automatically capitalized by Microsoft Word. There are several ways to correct your text. To correct the word "lazi", move the cursor after the letter "i" in that word by pushing the key on your keyboard. Each time you press that key, the cursor moves to the left one space. Now, press the backspace key on your keyboard, which is located usually above the enter or return key on your keyboard. The "i" is gone. Now type in "y". You have corrected the misspelled word.
Another way to do that is to do the following:
Press key twice now and your cursor should be before the letter "y". Press the delete key. The "y" is deleted. Now type in the "y" again.
Another way to correct misspelled words is by doing the following:
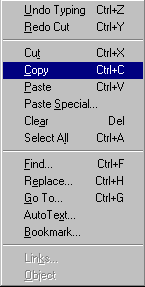
Press backspace and erase the "y". Type in an "i" as it appeared before as the word "lazi". Move your mouse cursor over the word "lazi" and click on the right mouse button. You'll get the following screen:
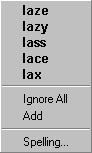
Click on the word "lazy" with the left mouse button. The word "lazi" will now change to the word "lazy". The other choices that were present were alternate matches that most resemble the word "lazi" and all you did is to chose the word that you want to replace the word "lazi" with.
Another useful tool of Microsoft Word is changing the appearance of words.
To do this, we will first boldface the entire line we just typed in, then we will italicize just the word "lazy" and finally we will underline the words "The fox jumped over the". Then we will center the entire sentence on the page, and then right justify the sentence and finally return the line to the left margin.
Place your mouse after the letter "g" in the word dog. Click on the left button of your mouse and don't let go of the mouse button. Now, while still holding down on the mouse's button, drag the mouse to the left until you reach and pass the "T" in the word "The". You will notice that the words will turn black.
![]() Now, release the mouse button and move
the mouse pointer over the "B" button on the menu at the top of the screen
Now, release the mouse button and move
the mouse pointer over the "B" button on the menu at the top of the screen ![]() . The sentence will look as follows now:
. The sentence will look as follows now:
![]() To get rid of the black highlight,
click on any white portion of the screen, other than where the text is located. The
sentence is now boldface and will look as follows:
To get rid of the black highlight,
click on any white portion of the screen, other than where the text is located. The
sentence is now boldface and will look as follows:
The fox jumped over the lazy dog
To italicize the word "lazy", we will use another method for highlighting. Notice, that whatever portion of our text is highlighted, is the portion that will be influenced by the change we make. Move the cursor before the letter "l" in the word lazy by using the key. Now press the button "F8". Continue to move the cursor to the left after the letter "y" in the word "lazy" using the key. The word lazy will turn black. Now, click on the "I" in the menu above the screen, located next to the "B" at the top of the screen. The word lazy is now italicized and will still be black. To rid of the highlight, click on any non-text white portion of the screen. The word will now look as follows: lazy
To underline the words "The fox jumped over the", you can now choose to use one of the two methods for highlighting these words- either by using the mouse and dragging or by using the keyboard and the "F8" key. Once these words are highlighted, click on the "U" button in the menu, located after the "I" button at the top of the screen. Now get rid of the highlight, by clicking on any non-text white portion of the screen.
To center this line, we will simply click on the ![]() button at the top of the screen. Notice how we don't have to highlight any
text, since by clicking on the button, the entire line will be centered (as a matter of
fact, if we had an entire paragraph written, the entire paragraph would be centered. If we
only wanted one line to be centered, then we would have to highlight that line and center
it individually). To right justify this line, click on the
button at the top of the screen. Notice how we don't have to highlight any
text, since by clicking on the button, the entire line will be centered (as a matter of
fact, if we had an entire paragraph written, the entire paragraph would be centered. If we
only wanted one line to be centered, then we would have to highlight that line and center
it individually). To right justify this line, click on the ![]() button and to return the line to the left, click on the
button and to return the line to the left, click on the ![]() button.
button.
Type in another line of text now, by pressing enter after the "g" in the word dog.
Type in on this line "I love my computer!". Notice how this line is also
centered. We will now double space these two lines. To do this, highlight both lines of
text by using one of the two methods described above for highlighting text. Now, if you
have a ![]() button at the top of your screen,
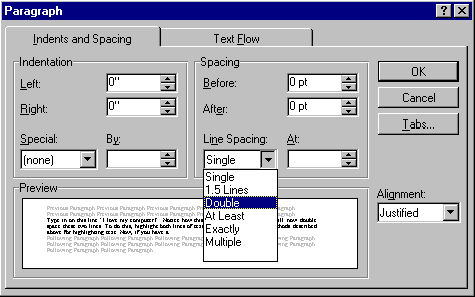
then click on it. If you don't then simply click on the word "Format" at the top
of your screen. A second menu will appear. Scroll down to the word "paragraph"
and click on it. Now, from the "Line Spacing" menu, click on the down arrow
after the word "Single". Now you will get a list of spacing options. Click on
Double to select double spacing. Click on "OK" from the menu and you will return
to your text, and it will be double spaced (look at picture below).
button at the top of your screen,
then click on it. If you don't then simply click on the word "Format" at the top
of your screen. A second menu will appear. Scroll down to the word "paragraph"
and click on it. Now, from the "Line Spacing" menu, click on the down arrow
after the word "Single". Now you will get a list of spacing options. Click on
Double to select double spacing. Click on "OK" from the menu and you will return
to your text, and it will be double spaced (look at picture below).
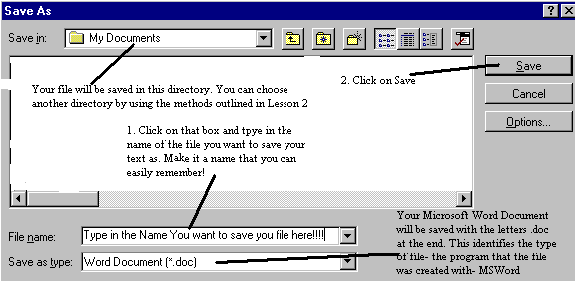
We will now discuss saving and printing your text. To save your text, that is to create a file that can be saved on your hard drive or floppy drive, which will retain the text that you typed in as well as any special features you've added to the text (i.e. bold, italics, underline, center, double-spaced), click on the File menu and scroll down to the word "Save" and click on it. Do the following to save your document, as shown in the picture below.
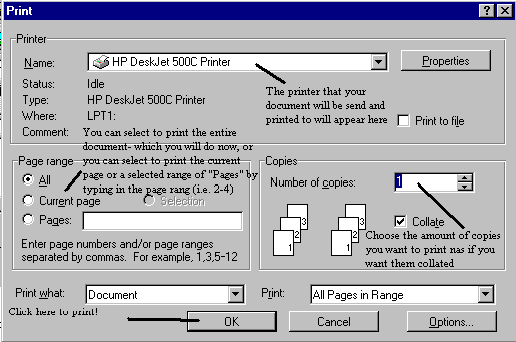
We will now print out the document- this is a second way of producing some output from your computer.
Click on "File" from the menu at the top of the screen. Scroll down to the word "Print" and click on it.
Do as the following picture explains (You need a printer attached to your computer to do the following!):
Another tool to know is how to open a file. This is discussed in Lesson 2!
We will now work on indenting a paragraph. Press enter now. Type in a few lines of one continuos letter by holding onto the letter and pressing the space bar in between every few letters to form a paragraph with spaces consisting of just one letter (look below).

Notice how every word is underlined by a red mark. That indicates that these aren't real words, which is true in this case. Sometimes you might get red marks underneath words such as names or other types of words which the computer doesn't recognize and will mark them red. If you are sure that the word is spelt correctly then just ignore the red marking- the red marking will not print!
Now, say we want to indent our paragraph at the word "Wwwwwww" , then move up your cursor before the capital "W" either by clicking before the "W" or by moving your cursor up using the up arrow to the first line of the paragraph of w's and by using the key to move the cursor to the left before the capital "W". Now press the "TAB" key which is on your left side of your keyboard. You have just indented the first line of your paragraph and should look as follows:

Notice how the paragraph isn't justified at the right side. To do this, first highlight the entire paragraph either by using the mouse or using the "F8" key on the keyboard. It should now look as follows:

Now press the justification button which looks as follows:![]()
Your paragraph is now justified. Click on any non-text white portion on your screen. The highlight will now disappear and you paragraph should look like this:

We will now move to another topic. This topic is called Cutting and Pasting. We can cut a portion of our text from a paragraph or sentence and then paste that portion that we cut into another paragraph or document. We do this as follows:

Your paragraph will now look as follows:

6. Now move your cursor to the position you want to paste the text at- that is before the letter "T" in the word "The" in the third sentence.
![]()
Now press paste from the edit menu and your paragraph will look as follows:

7. You have just pasted your text in the correct position that it belongs. If you have
no space between the last word of the second sentence "itself." and the word
"This", then push the space bar after the period proceeding the word
"itself". If there is no space between the word "boundaries." and the
word "The" of the last sentence than push the space bar proceeding the word
"boundaries.".
We will now learn a few useful tools of Microsoft Word. Right now your cursor should be in the middle of the page. Say we wanted to move to the first letter on that line, then you should press the "Home" key on the right side of your keyboard. If you want to move to the last letter on the line, then push the "End" key. If you had a multi-paged document and wanted to jump from one page to another, you would use the "Page up" or "Page down" buttons.
To access the menu above the screen- the menu with the words "File, Edit, View, etc.…" you can either use your mouse as you've been doing, or another way is to press the "Alt" key to the right or left of your space bar and press the underlined letter of the portion of the menu that you wish to access. For example, to access the File menu, notice how the letter "F" is underlined on the menu as show below:
![]()
Now press Alt and then the letter "F" on your keyboard. The menu will then appear.
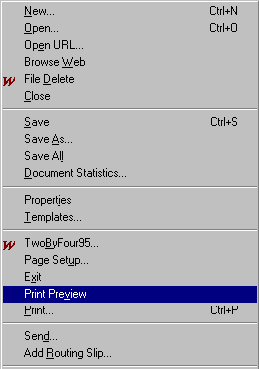
Another tool to use before printing is called "Print Preview". Go to the File menu and click on the word "Print Preview"
or else you can click on the Print Preview button at the top of your screen which looks
as follows: ![]()
You will then get the following screen:
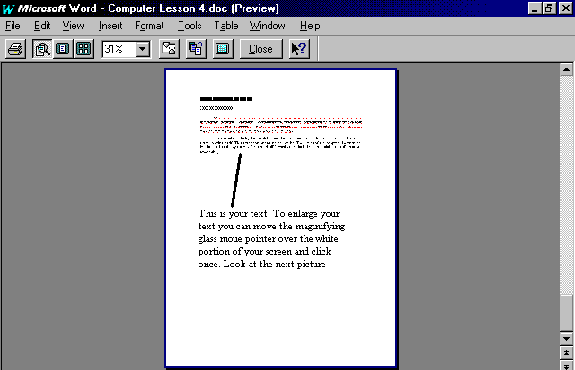
To enlarge your text, click on any white portion of the screen. You'll get the following screen:
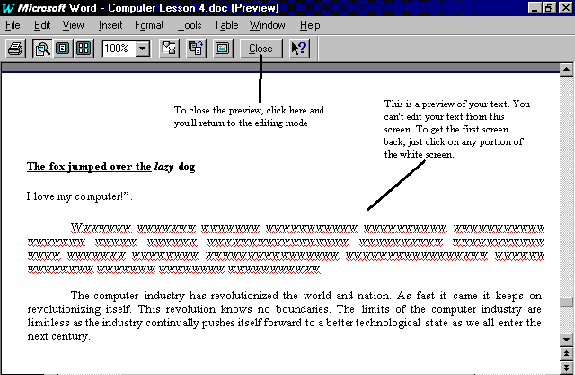
To close the preview and return to editing, click on the close button. To return to the previous overview of the page, click again on any white portion of the screen.
Once you have returned to the editing screen, save your document by going to file and choosing save. Notice how you didn't have to retype the file name. If you wanted to rename your file, then you can choose "Save As" which will allow you to rename the file.
After saving your document, we will now learn how to close the document without exiting Microsoft Word. Go to File and click on Close.
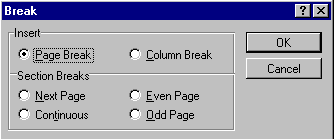
You'll then get a blank white screen. Now re-open your document using File-Open as described in Lesson 2. We will now learn how to insert page breaks and page numbers. A page break automatically starts you off on a new page, even if you're in the middle of a page of text. To do this, place the cursor on a new line. This line should be proceeding the last line of the page, so that all the text typed on the line that you're cursor is located on will be on the new page. Then go to the "Insert" menu and choose "Break"
Then choose "Page Break", which is normally already chosen for you. Then press "OK"
You will then notice the following horizontal line appear on your screen.
![]()
You have inserted a page break. To delete the page break, you can bring the cursor after the page break line and press backspace.
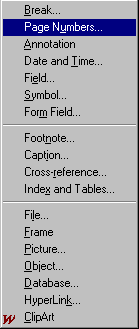
To insert page numbers, go to the "Insert" menu and choose "Page Numbers"
Then you'll get the following screen:
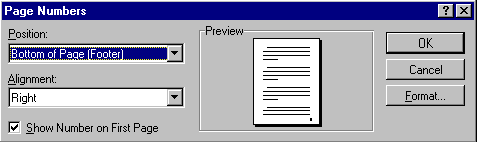
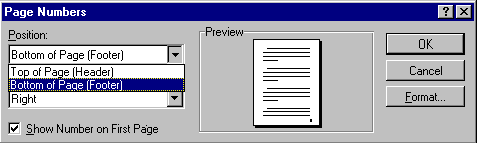
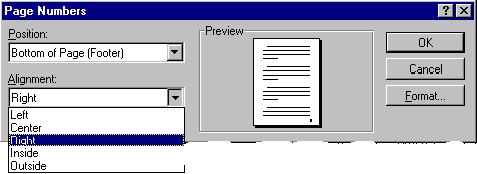
Choose the options you want:
Press "OK" and the page numbers will be inserted. To view the page numbers and the effect of any page breaks, you need to use print preview.
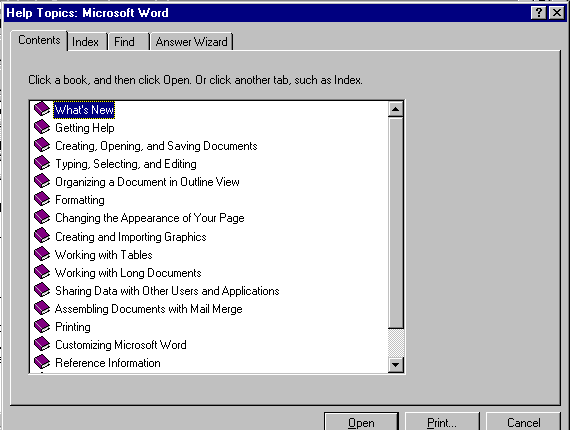
We have now learned a large portion of Microsoft Word. If you need any additional help, go to the "Help" menu

Click on "Microsoft Word Help Topics". From the menu that will then appear, choose "Contents" and double click on any one of the help books to learn more about one of those topics, just like what you did for QuickTutor
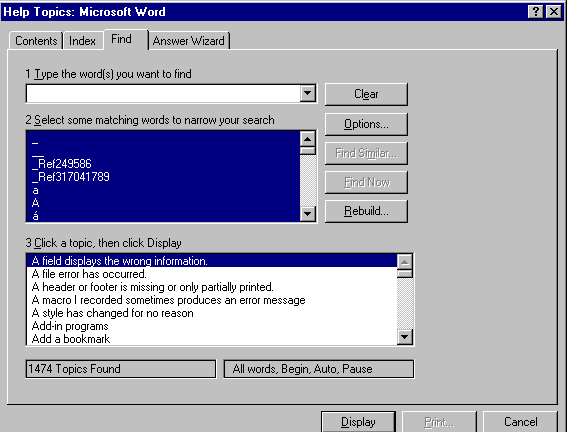
You can also choose "Find" and type in any keywords that you are interested in and the computer will give you a list of matching topics. You then must choose one of those topics and you will be given a help screen with the information you requested.
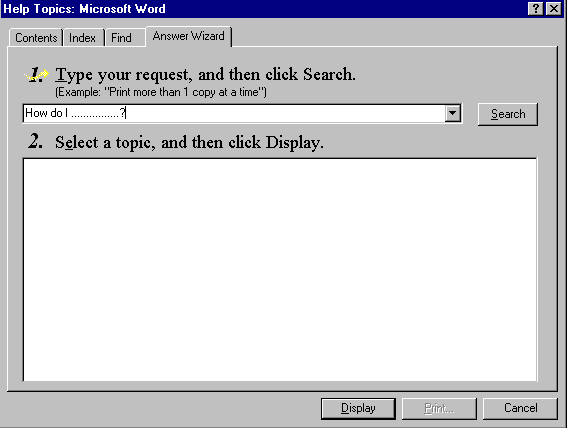
Another new and helpful feature of Microsoft Word is "Answer Wizard". Here, you can type in the question you are interested in and the computer will give you the topics that match your question and thereby your answer.
You should use any of these help forms for any other information that you might need further down the line during your word-processing.
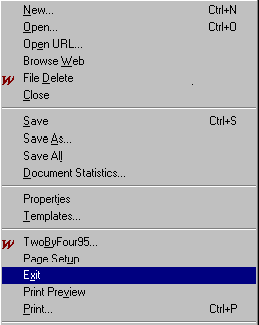
You can now exit Microsoft Word using the File-Exit method.
You will then return to the Microsoft Windows 95 Main screen/desktop.